Recipes
from the kitchens of The Cales Family of Stump Lick Hollow
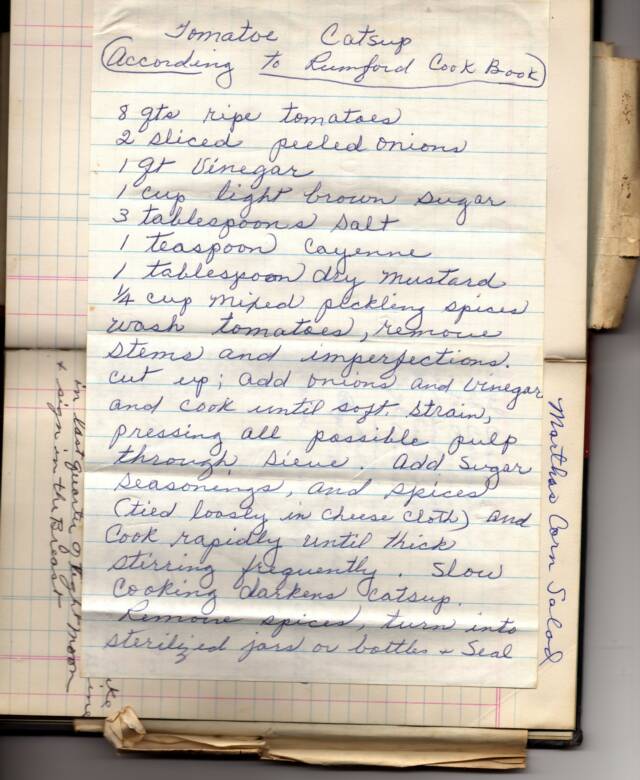
Grandma Cales' Catsup Recipe
from her old Rumford Cook Book


Kitty Litter Kake! Will add fun to your party! It's Great for Halloween or your Mother-in Law's birthday!

"Kitty Litter Kake!"
WANT TO HAVE FUN AT A PARTY? PREPARE THIS RECIPE! COMPLETELY EDIBLE,
Great for Halloween, or for Mother-in-Law's Visit!!!!!!
CAKE INGREDIENTS:
3 "Brand 'X', off the shelf no-bake cheese cake mixes - ( Some include graham cracker crumbs, I used Honey Maid grahams for the bottom crust ).
1 box spice or German chocolate (I USED CARROT CAKE) cake mix
1 package white sandwich cookies
1 large package vanilla instant pudding mix
A few drops green food coloring
12 small Tootsie Rolls or equivalent
SERVING "DISHES AND UTENSILS"
1 NEW cat-litter box (MINE IS 12.5" X 16.5" * SO I NEEDED 1.5 BOXES GRAHAMS FOR BOTTOM CRUST)
1 NEW pooper scooper
**In new litter box prepare graham cracker bottom crust ( Crushed Graham Crackers and margarine).Chill the crust while you mix the no-bake cheesecake. Then pour no-bake cheesecake over crust to about 1.5-2" deep. Set aside or chill while prepping rest of cake.
1) Prepare and bake cake mixes (I USED TWO), according to directions, in any size pan. Prepare pudding and chill. Crumble cookies in small batches in blender or food processor. Add a few drops of green food coloring to 1 cup of cookie crumbs. Mix with a fork or shake in a jar. Set aside.
2) When cake is at room temperature, crumble into a large bowl. Toss with half of the remaining cookie crumbs and enough pudding to make the mixture moist but not soggy. Place liner in litter box and pour in mixture.
3) Unwrap 3 Tootsie Rolls and heat in a microwave until soft and pliable. Shape
the blunt ends into slightly curved point s. Repeat with three more rolls. Bury the rolls decoratively in the cake mixture. Sprinkle remaining white cookie crumbs over the mixture, then scatter green crumbs lightly over top.
4) Heat 5 more Tootsie Rolls until almost melted. Scrape them on top of the cake and sprinkle with crumbs from the litter box. Heat the remaining Tootsie Roll until pliable and hang it over the edge of box. Place box on a sheet of newspaper. Serve with scooper!
Enjoy!!!
Cooking Turkey
THAWING A TURKEY
What is the best way to thaw a turkey? There are three ways to safely thaw a turkey, but refrigerator thawing is recommended. Defrost the turkey in its original wrapper on a tray in the refrigerator 24 hours for every 5 pounds. Never thaw a turkey at room temperature.
You may also place the wrapped turkey in the sink and cover it completely with cold water for about 30 minutes per pound. Change the water every 30 minutes to make sure it stays cold. If the wrapping is torn, place the turkey in another plastic bag, close securely, and then place in water.
For thawing in the microwave, check the manufacturer’s instructions for the size of turkey that will fit into your oven, the minutes per pound and the power level to use for thawing. Cook immediately after thawing.
TABLE 1. THAWING TIMES FOR A TURKEY
Turkey Size (lbs.)
Refrigerator (Days)
Cold Water (Hours)
8-12
1-2
4-6
12-16
2-3
6-8
16-20
3-4
8-10
20-24
4-5
10-12
PREPARATION
After thawing, get the turkey ready for cooking by following these steps:
Remove original plastic wrapper from thawed or fresh turkey.
Remove the neck and giblets from the body and neck cavities.
Rinsing the turkey is no longer recommended because of the risk of cross-contamination from rinse water being splashed around the sink, on the counter and on foods. (The recommended roasting temperature easily destroys any bacteria on the surface of the turkey.)
If stuffing the turkey, do so just before roasting.
Return legs to tucked position, if untucked.
If using an oven-safe meat thermometer, insert into the deepest part of the thigh. (If using an instant-read thermometer, it will be inserted when it is time to check for doneness.)
Brush with oil to prevent drying of the skin.
WASH HANDS, UTENSILS, SINK AND EVERYTHING ELSE THAT HAS BEEN IN CONTACT WITH RAW TURKEY. Sanitize the counter, sinks and any containers or trays that have been used. Use a solution of 1 teaspoon of unscented chlorine bleach in 1 quart of water, and let dry completely.
STUFFING A TURKEY
To stuff or not to stuff? This is an important question to ask because cooking a home-stuffed turkey can be somewhat riskier than cooking one not stuffed. If the stuffing is not cooked and handled properly, foodborne illness could occur. However, with careful preparation and the use of a meat thermometer to ensure that safe temperatures are reached, consumers can safely enjoy the traditional stuffing, inside or outside the bird. Follow these safe stuffing tips:
Prepare Stuffing Safely: Mix the stuffing just before it goes into the turkey. Use only cooked ingredients in stuffing such as sautéed vegetables, cooked meats and seafood (oysters), and pasteurized egg products instead of raw eggs. If more convenient, the wet and dry ingredients can be prepared separately ahead of time and chilled. Mix the ingredients just before placing the stuffing inside the turkey or in a casserole.
Stuff The Bird Properly: Stuff both neck and body cavities. The turkey should be stuffed loosely, about three-quarters cup of stuffing per pound of turkey. This will help allow the stuffing to reach the proper 165 °F internal temperature whether the stuffing is in the bird or in a casserole. Use a meat thermometer to be sure of the temperature. The stuffing should be moist, not dry, since heat destroys bacteria more rapidly in a moist environment.
Cook At The Proper Temperature: The stuffed turkey should be placed immediately in a preheated oven set no lower than 325 °F. Cooking overnight in a "slow" oven is not recommended for stuffed or unstuffed turkey, since foodborne bacteria can form under these conditions.
Use A Meat Thermometer: Checking the stuffing temperature with a thermometer is essential. That is because even if the turkey itself has reached the proper internal temperature of 165 °F in the inner-most part of the thigh, the stuffing may not have reached the correct temperature of 165 °F in its center. It is important to reach this temperature in all parts of the stuffing to be sure that foodborne bacteria are destroyed.
Pre-stuffed Poultry: Pre-stuffed whole poultry is highly perishable and should be purchased only if it displays the USDA or State mark of inspection on the package, which indicates they have been processed under controlled conditions. DO NOT THAW before cooking. Cook from the frozen state. Follow package directions for proper handling and cooking to ensure a safely cooked product.
COOKING A TURKEY
Safety and Preparation Notes for All Methods:
Never brown or partially cook turkey to refrigerate and finish cooking later. It is safe to partially cook or microwave turkey if it is immediately transferred to a hot grill or oven to finish cooking.
It is not necessary to baste a turkey. Pouring juices over a turkey’s surface while it roasts will not make the meat juicier. The liquid penetrates only about 1/8 to ¼ of an inch beneath the skin and most of the juice will run off into the pan. Opening the oven door to baste a turkey can cool the oven and possibly lengthen the roasting time.
Roasting Method: The open pan roasting method will consistently create a juicy, tender, golden brown, picture-perfect turkey.
Place thawed or fresh turkey, breast up, on a flat rack in a shallow pan, 2 to 2½ inches deep.
Insert oven-safe meat thermometer into the thickest part of the thigh. Brush or rub skin with oil to prevent drying of the skin and to enhance the golden color.
Place in a preheated 325 °F oven.
When the skin is a light golden color and the turkey is about two-thirds done, shield the breast loosely with a tent of lightweight foil to prevent overcooking of the breast.
Use the roasting schedule in Table 2 as a guideline; start checking for doneness a half-hour before recommended end times.
Turkey is safe when cooked to a minimum internal temperature of 165 °F as measured with a food thermometer. Check the internal temperature in the innermost part of the thigh and wing and the thickest part of the breast. For reasons of personal preference, consumers may choose to cook turkey to higher temperatures
Let turkey stand for 15 to 20 minutes before carving to allow juices to set.
TABLE 2. Approximate ROASTING TIMES FOR TURKEY (325 °F oven temperature)
Always use a food thermometer to check the internal temperature of both turkey and stuffing.
Size of Turkey
Unstuffed Timing
Stuffed Timing
8-12 lbs.
2¾ - 3 Hours
3 - 3½ Hours
12-14 lbs.
3 - 3¾ Hours
3½ - 4 Hours
14-18 lbs.
3¾ - 4¼ Hours
4 - 4¼ Hours
18-20 lbs.
4¼ - 4½ Hours
4¼ - 4¾ Hours
20-24 lbs.
4½ - 5 Hours
4¾ - 5¼ Hours
Smoke-Cooking Method:
Soak hardwood chips in water for 1-2 hours.
Start with completely thawed turkey for even, safe cooking.
Remove giblets and neck; drain juices.
DO NOT STUFF.
DO NOT USE STRING LIFTER.
Insert oven-safe meat thermometer into deepest part of the thigh, not touching bone.
Brush skin lightly with vegetable oil.
Plug in electric smoker or ignite charcoal about 30 minutes before cooking.
Position foil-lined water pan in smoker according to manufacturer’s directions; fill pan with water.
Check temperature of grill at grate. Be sure temperature is between 200 to 250 °F.
Place turkey on grill. Cover and adjust vents according to manufacturer’s directions.
Maintain 200 to 250 °F temperature throughout cooking. If using charcoal smoker, add additional briquettes every 1 to 1½ hours.
Replenish water and soaked hardwood chips as needed.
Cook turkey to internal temperature of 165 °F in breast and innermost part of thigh. Turkey may take up to 12 hours.
Safety Notes For Smoking Turkey:
Always follow equipment manufacturer’s guidelines.
Cooking times will vary depending on wind, weather, altitude and type of equipment.
For safety, turkey must reach 140 °F in four hours or less. Check after 3½ hours, if temperature is low, finish in oven.
Always use thermometers to monitor turkey smoker and temperatures.
Total cooking time will be increased 10 minutes or more each time lid is lifted.
Smoking has no preservative effect. Smoked turkey must be refrigerated.
Microwaving Method: Always check the user’s manual for cooking recommendations.
A 12 to 14 pound turkey is the maximum size most microwaves can accommodate.
Allow 3 inches oven clearance on top and 2 to 3 inches of space around bird.
DO NOT STUFF!
Use an oven-cooking bag for more even cooking.
Microwave on medium-high (50 percent) for a whole turkey, 9 to 10 minutes per pound.
Always use a meat thermometer to deter-mine doneness. Temperature should reach 165 °F before removing from oven.
Let bird stand 20 minutes after removing from microwave before carving.
Deep Fat Fried Whole Turkey: Some people enjoy fried whole turkey. This method of preparation requires special equipment and extra expense.
The equipment needed includes a 40- or 60-quart pot with basket, burner and propane gas tank; a candy thermometer to measure oil temperature; and a meat thermometer to determine if the turkey is done. For added safety, have a fire extinguisher and pot holders nearby. Never leave the hot oil unattended, nor allow children or pets near it. Never fry a turkey indoors or in a garage or other structure. Avoid frying on wood decks, which could catch fire, and concrete, which can be stained by the oil.
To Safely Fry a Whole Turkey, Follow These Steps:
Start with a completely thawed turkey. Do not stuff the turkey to deep fry.
Use a pot large enough to hold the turkey and enough oil to cover it. This could be as much as five gallons of oil. Set up your turkey fryer on level dirt or a grassy area.
Determine the correct amount of oil by covering the turkey in the pot with water to a level 1 to 2 inches above the turkey. Remove the turkey and measure the distance from the top of the pot to the surface of the water. Pour out the water and dry the pot thoroughly. Be sure to measure for oil before breading or marinating the turkey.
Heat the oil to 350 ° F. Depending on the amount of oil used, this takes between 45 minutes to an hour. Most people prefer peanut oil. Carefully put turkey in the oil.
Cook for 3 minutes per pound. Skin will be black and wings will be burned.
Use a meat thermometer to check for doneness. Turkey is done when the thermometer registers an internal temperature of 165 ° F.
Carefully remove the turkey from the oil and serve.
Allow the oil to cool before disposing or storing it. To store oil, strain through cheese cloth or a coffee filter and refrigerate. Do not store oil that has been heated to the smoking point, has turned dark or has an off-odor. Reuse the oil within a month and discard if it foams when reheated.
LEFTOVERS
Within two hours after roasting, remove stuffing from turkey and carve the meat off the bones; then store in refrigerator or freezer. Gravy, stuffing and meat need to be stored SEPARATELY from each other. Turkey may be stored in the refrigerator for up to three days. For longer storage, wrap in heavy foil or freezer wrap, or place in freezer container; use stuffing within one month and turkey within two months.
GIBLETS
Safe Handling: In whole, ready-to-cook poultry, giblets are located in a bag in the abdominal cavity. They will not be from the original bird. Giblets may also be purchased separately as livers, hearts, or a combination thereof, and labeled accordingly. At home, immediately place giblets in a refrigerator that maintains 40 °F or below, and use within one or two days; or freeze at 0 °F or below. If kept frozen continuously, they will be safe indefinitely. However, for best quality, use giblets within three to four months of freezing.
Defrosting: There are three safe ways to defrost giblets and poultry containing them: in the refrigerator, in cold water or in the microwave oven. Never defrost giblets on the kitchen counter.
Refrigerator Thawing: As a rule of thumb, whole poultry with giblets will take about 24 hours for every 5 pounds of weight to thaw in the refrigerator. A 1-pound carton of frozen turkey livers will take about 24 hours. Once defrosted, the giblets may be stored in the refrigerator for 1 to 2 days. During this time, if giblets are not used, they can be safely refrozen.
Cold Water Thawing: Leave the giblets or poultry containing them in the original airtight packaging or place in a leak-proof bag. Submerge the product in cold water and change the water every 30 minutes to make sure it stays cold. A 1-pound carton of livers should defrost in one or two hours.
Microwave Thawing: Cook giblets and poultry containing them immediately after microwave defrosting because some areas of the food may become warm and begin to cook. Holding partially cooked food is not recommended because any bacteria that may have been present may not have been destroyed. Foods defrosted in the microwave or by the cold-water method should be cooked before refreezing.
Cooking: Traditionally, chicken or turkey giblets are cooked by simmering in water for use in flavoring soups, gravies or poultry stuffing. Once cooked, the liver will become crumbly and the heart and gizzard will soften and become easy to chop.
Cooked giblets should have a firm texture and their juices should run clear. Casseroles and stuffing containing giblets should be cooked to 165 °F. Chicken giblets are commonly fried or broiled. Leftovers should be refrigerated within two hours.
Accidental Cooking in Packaging: Some giblets are paper wrapped before being inserted into the poultry body cavity. In this case, there would be no concern if the giblets were accidentally cooked inside the bird to a safe temperature. If giblets were packed in a plastic bag, and the bag has been altered or melted by the cooking process, do not use the giblets or the poultry because harmful chemicals may have leached into the surrounding meat. If the plastic bag was not altered, the giblets and poultry should be safe to use as long as the meat is fully cooked.
Sources:
USDA/FSIS (2006, April). Safety of Giblets http://www.fsis.usda.gov/Fact_Sheets/giblets_and_food_safety/index.asp
USDA/FSIS (2006, July). Let’s Talk Turkey—A Consumer Guide to Safely Roasting a Turkey. http://www.fsis.usda.gov/Fact_Sheets/Lets_Talk_Turkey/index.asp
Butterball® Turkey Home Page, Butterball’s Top Ten. and Smoke-Cooking Butterball® Turkey. http://www.butterball.com
National Turkey Federation. Deep Frying Turkey. http://ww.turkeyfed.org/consumer/cookinfo/fryturk.html
--------------------------------------------------------------------------------
This information has been reviewed and adapted for use in South Carolina by P.H. Schmutz, HGIC Specialist, and E.H. Hoyle, Extension Food Safety Specialist, Clemson University.
--------------------------------------------------------------------------------
This information is supplied with the understanding that no discrimination is intended and no endorsement by the Clemson University Cooperative Extension Service is implied. All recommendations are for South Carolina conditions and may not apply to other areas. (New 2/99, Revised 12/99. Revised 11/06.)
The Clemson University Cooperative
Zucchini Nut Bread
3 Eggs
2 Cups Sugar
1 Cup Vegetable Oil
1 Tbs. Vanilla
2 Cups Loosely Packed Grated Zucchini
2 Cups Flour
1 Tbs. Cinnamon
1½ Tsp. Baking Powder
1 Tsp. Salt
½ Tsp. Baking Soda
1 Cup Chopped Walnuts
Preheat oven to 350 degrees.
In a large bowl, beat eggs until frothy.
Add sugar, vegetable oil & vanilla.
Beat until thick and evenly colored.
Fold in grated zucchini.
Fold in chopped walnuts.
Sift remaining ingredients together and fold into mixture in bowl.
Pour batter into 3 greased and floured loaf pans.
Bake at 350 degrees for 45 minutes.
Cheese Biscuits!
2 cups all-purpose flour
5 teaspoons baking powder
1 teaspoon baking soda
1 teaspoon salt
1/2 cup grated sharp cheddar cheese
4 ounces cold goat cheese, coarsely broken into chunks
5 tablespoons cold unsalted butter, cut into pieces
1 cup plus 2 tablespoons cold buttermilk
4 tablespoons melted unsalted butter
1/4 cup (1/2 ounce) finely grated Parmesan cheese
Directions
Preheat the oven to 450 degrees F and place a 10-inch cast-iron pan in the oven to preheat.
Whisk the flour, baking powder, baking soda and salt in a large bowl to blend.
Using a pastry cutter, cut the cheddar cheese, half of the goat cheese and 4 tablespoons of cold butter into the flour mixture until the butter resembles small pea-size pieces.
Form a well in the center of the flour mixture and pour the buttermilk into the well.
Stir just until the mixture is moistened but still lumpy.
Fold in the remaining goat cheese.
Remove the cast-iron pan from the oven and melt 1 tablespoon of butter in the pan.
Drop 6 mounds of dough into the hot pan, spacing evenly apart.
Brush the tops of the biscuits generously with some of the melted butter.
Bake 10 minutes. Brush with some of the remaining butter and continue to bake until golden brown on the top and the bottom, about 10 minutes longer.
Remove the pan from the oven then brush the biscuits with the remaining melted butter and sprinkle with the Parmesan cheese. Cool slightly.
Serve warm and enjoy.


Now, here's one long recipe!!!
Peach-Blueberry Cobbler!
Preparation time: 35 to 40 minutes
Preheat oven to 375
Baking time - about 40 minutes
Serves 6 - 8
***
2 pounds firm, ripe nectarines or peaches (or a combination of both)
1 cup blueberries
1 lemon
1/3 cup plus 2 tablespoons granulated sugar
2 tablespoons light brown sugar, packed
1 1/2 cups plus 2 tablespoons all-purpose flour
1/2 teaspoon cinnamon
7 tablespoons cold butter
2 teaspoons baking powder
1/2 teaspoon salt
8 to 10 tablespoons heavy cream or half-and-half, plus 3/4 cup heavy cream, well chilled
Confectionery sugar
1/2 teaspoon vanilla
1. Halve the peaches or nectarines, removing pits
2. Cut each half into 4 to 5 wedges and place in a large mixing bowl.
3. Rinse, pick over, and stem the berries.
4. Cut the lemon in half.
5. Zest and juice one half of the lemon.
6. Add the blueberries, lemon zest and juice, 1/3 cup granulated sugar, the light brown sugar, 2 tablespoons flour, and cinnamon to the mixing bowl.
7. Toss to mix well.
8. Taste the fruit to see if it’s sweet enough.
9. If necessary, add more sugar.
10. Turn the fruit mixture into a 2-quart baking dish that’s 2 inches deep.
11. Cut the butter into small pieces.
12. Dot the top of the fruit with 1 tablespoon of the butter.
13. Bake for 10 minutes.
14. In a medium mixing bowl, toss together the remaining flour, the remaining sugar, baking powder, and salt.
15. Add the remaining butter and cut the butter into the dry ingredients until the mixture resembles coarse breadcrumbs.
16. You can use a pastry blender, 2 knives, or your fingertips.
17. Juice the remaining lemon half.
18. Sprinkle the flour mixture with 1 teaspoon lemon juice.
19. Gradually stir in just enough of the 8 to 10 tablespoons of heavy cream or half-and-half to moisten the dough so that it holds together and can be rolled or patted.
20. Use a fork, wooden spoon, or rubber spatula.
21. Gather the dough into a ball and place it on a lightly floured work surface.
22. Roll out or pat the dough with your hands so that it’s about 1/2-inch thick and roughly matches the shape of the top of the baking dish.
23. Cut the dough into 2-1/2-inch circles.
24. Use a biscuit cutter, round cookie cutter, or knife. Alternatively, you can gently roll small pieces of the dough into balls and flatten each into 1/2-inch-thick rounds. You should have 9 to 10 circles.
25. After 10 minutes, remove the fruit from the oven.
26. Place the dough on top of the fruit.
27. Return the cobbler to the oven and bake 30 to 35 minutes more, or until the topping is golden brown and the fruit is bubbling around the edges.
28. Pour 3/4 cup heavy cream into a medium mixing bowl.
29. Using an electric mixer, beat the cream just until it starts to thicken.
30. Add the confectioners’ sugar to taste and the vanilla.
31. Continue beating until soft peaks form.
32. Refrigerate until ready to use.
33. Spoon the warm cobbler into shallow bowls.
34. Spoon some of the cream over each serving.
35. Drizzle some of the fruit juices over the cobbler.
Serve!!
HELP!!
Hey! You guys! We need recipes! Pictures, poems,
NEWS!

Peanut Butter Potato Candy
1/3 cup real mashed potatoes (from 1 potato)
2 tablespoons half and half (or you can use milk)
1 teaspoon vanilla extract
Dash salt
4-6 cups confectioner’s sugar
Peanut butter
Boil or microwave potato until it is soft. Remove and discard skin, mash (do not add anything) and cool completely. When cool, measure potato and add to a mixing bowl.
Add half and half (or milk), vanilla, dash of salt, and 2 cups confectioner’s sugar. Mix well using an electric mixer on low speed. Add 2 more cups confectioner’s sugar, mixing well. It should resemble dough. Add more sugar by tablespoonfuls if dough seems too wet or sticky.
Split dough into quarters, so it is easier to work with. Dust a board with confectioner’s sugar and roll out a piece of potato-sugar dough until it is roughly square or rectangular, and about ¼-inch thick. Spread one side with peanut butter. Roll up dough like a jelly roll. Repeat with others, or make flavor variations as described below.
Wrap in plastic wrap and refrigerate rolls, tightly covered, for about 1 hour. Remove from refrigerator and slice roll into pinwheels. Serve immediately, or return slices to refrigerator until you are ready to serve them. If you are stacking them, use a piece of waxed paper between layers so the candies won’t stick together. Cover tightly because they can dry out.
Note: only real potatoes will work here. Don't use instant or flakes.
Fleischmann’s Sourdough Starter
2 cups all-purpose flour
1 package or 8 grams Fleischmann’s Traditional Active Dry Yeast or Quick-Rise Instant Yeast
2 cups lukewarm water (105 to 115 F or 40 to 45 C)
In 2-quart container or larger plastic container with tight-fitting lid, combine flour and undissolved yeast. Gradually add water to the dry ingredients and beat until smooth. Cover loosely; let stand in warm place until bubbly and sour-smelling, about 2 to 4 days. Starter may darken, but if it changes to another color, discard and start over (no pink, says Sue). To store, cover tightly and refrigerate until ready to use.
To keep starter alive: Once a week, stir in 1 tablespoon all-purpose flour and 1 tablespoon lukewarm water (105 to 115 F or 40 to 45 C). Beat until smooth. Cover loosely; let stand until bubbly, 12 to 24 hours.
To replenish starter: For each 1 ½ cups of starter used, add 1 ½ cups all-purpose flour and 1 ½ cups lukewarm water. Beat until smooth. Cover loosely; let stand until bubbly, 12 to 24 hours. Store as above.
Now for the bread:
Fleischmann’s Sourdough Bread
Makes 2 loaves.
1 ½ cups sourdough starter (use Sourdough Starter recipe above or your own starter)
3 ½ to 4 ½ cups all-purpose flour*
1 package or 8 grams Fleischmann’s Traditional Active Dry Yeast or Quick-Rise Yeast
1 teaspoon salt
1 cup very warm water (120 to 130 F or 50 to 55 C)
Cornmeal
Stir sourdough starter before measuring. Measure out 1 ½ cups sourdough starter and bring to room temperature.
In large bowl, combine 1 ½ cups flour, undissolved yeast, and salt. Gradually add water and starter to dry ingredients; beat 2 minutes at medium speed of electric mixer, scraping bowl occasionally. Beat 2 minutes at high speed (Sue’s note: I didn’t do this high speed mixing step). With spoon, stir in enough remaining flour to make soft dough. Knead on floured surface until smooth, about 8 minutes. Place in a greased bowl, turning to grease top. Cover; let rise in warm, draft-free place until doubled in size, 30 to 60 minutes. (With Quick-Rise Instant Yeast, cover kneaded dough and let rest on floured surface 10 minutes. Proceed with recipe.)
Punch dough down. Remove dough to floured surface; divide in half. Roll each half to 12 X 9-inch rectangle. Beginning at long end of each, roll up tightly as for jelly roll.Pinch seams and ends to seal. Taper ends by gently rolling back and forth. Place, seam sides down, on large greased baking sheet sprinkled with cornmeal. Cover; let rise in warm, draft-free place until doubled in size, about 30 to 45 minutes.
With sharp knife, make 4 or 5 diagonal slashes (1/4 inch deep) across top of each loaf. Bake at 400 F/200 C for 30 to 35 minutes or until done. For crispy crust, spray loaves with water just before baking and every 5 minutes during the first 10 minutes of baking time. Remove from baking sheet; let cool on wire rack.
*The amount of flour needed varies according to the consistency of the starter.
“Fleischmann’s Yeast: Best-Ever Breads.” Des Moines, Iowa: Meredith Custom Publishing, 1996.
Beer Cheese Soup with Garlic Butter Crostini
Ingredients
3 tablespoons unsalted butter
2 carrots, finely diced
2 stalks celery, finely diced
2 cloves garlic, minced
1 small onion, finely diced 1/2 teaspoon dry mustard powder
Pinch cayenne pepper
Kosher salt and freshly ground black pepper
3 tablespoons all-purpose flour
2 cups chicken stock
2 teaspoons Dijon mustard
1 teaspoon Worcestershire sauce
1 bottle pale ale, such as Pabst Blue Ribbon
2 cups shredded sharp yellow Cheddar
1 cup shredded gruyere
1/2 cup half-and-half
Garlic Butter Crostini, for serving, recipe follows
Directions
Melt the butter in a Dutch oven or large saucepot over medium heat. Add the carrots, celery, garlic, onions, mustard powder, cayenne and sprinkle with salt and pepper. Sweat the vegetables until tender, about 15 minutes. Sprinkle the flour over the vegetables and cook, stirring constantly, about 1 minute. Pour in the stock, mustard and Worcestershire and simmer until the veggies are very soft, about 15 minutes. Add the ale, simmer, about 5 minutes, and then puree with an immersion blender until smooth. Add the Cheddar, gruyere and half-and-half and stir until melted through and smooth. Adjust the seasoning and top with the Garlic Butter Crostini. Enjoy with a 30-pack of your favorite cheap beer.
Garlic Butter Crostini:
1/2 baguette, sliced into 12 thin slices on the diagonal
3 tablespoons unsalted butter, softened
Kosher salt
1 clove garlic
Heat a grill pan over medium heat. Brush the baguette slices on both sides with the butter and sprinkle with salt. Grill the slices on both sides until grill marks form, about 3 minutes per side. Rub the slices with the garlic.
.
Ingredients
3 tablespoons unsalted butter
2 carrots, finely diced
2 stalks celery, finely diced
2 cloves garlic, minced
1 small onion, finely diced 1/2 teaspoon dry mustard powder
Pinch cayenne pepper
Kosher salt and freshly ground black pepper
3 tablespoons all-purpose flour
2 cups chicken stock
2 teaspoons Dijon mustard
1 teaspoon Worcestershire sauce
1 bottle pale ale, such as Pabst Blue Ribbon
2 cups shredded sharp yellow Cheddar
1 cup shredded gruyere
1/2 cup half-and-half
Garlic Butter Crostini, for serving, recipe follows
Directions
Melt the butter in a Dutch oven or large saucepot over medium heat. Add the carrots, celery, garlic, onions, mustard powder, cayenne and sprinkle with salt and pepper. Sweat the vegetables until tender, about 15 minutes. Sprinkle the flour over the vegetables and cook, stirring constantly, about 1 minute. Pour in the stock, mustard and Worcestershire and simmer until the veggies are very soft, about 15 minutes. Add the ale, simmer, about 5 minutes, and then puree with an immersion blender until smooth. Add the Cheddar, gruyere and half-and-half and stir until melted through and smooth. Adjust the seasoning and top with the Garlic Butter Crostini. Enjoy with a 30-pack of your favorite cheap beer.
Garlic Butter Crostini:
1/2 baguette, sliced into 12 thin slices on the diagonal
3 tablespoons unsalted butter, softened
Kosher salt
1 clove garlic
Heat a grill pan over medium heat. Brush the baguette slices on both sides with the butter and sprinkle with salt. Grill the slices on both sides until grill marks form, about 3 minutes per side. Rub the slices with the garlic.
Hey, Folks!
Don't forget to 'scroll' way down this page to check out all the recipes!
Got a recipe you'd like to share?
E-Mail to : wkctheben@aol.com
Blanche Cales Staton shared Friends in the Kitchen's photo.
BUTTERMILK PIE:
1/2c buttermilk
1 3/4c sugar
2 large eggs
3tbsp flour
pinch of salt
1 stick butter
1tsp vanilla
nutmeg
Preheat oven to 400°. Mix everything together and pour into an unbaked 9" pieshell. Sprinkle the top lightly with nutmeg. Bake 15min. Reduce oven to 350° and bake 45min. Cool to allow filling to set.
Note: Thanks, Blanche! A cook at a nursing home gave me the recipe about 1988 and I had misplaced (LOST) it! I love Buttermilk Pie!
Ben
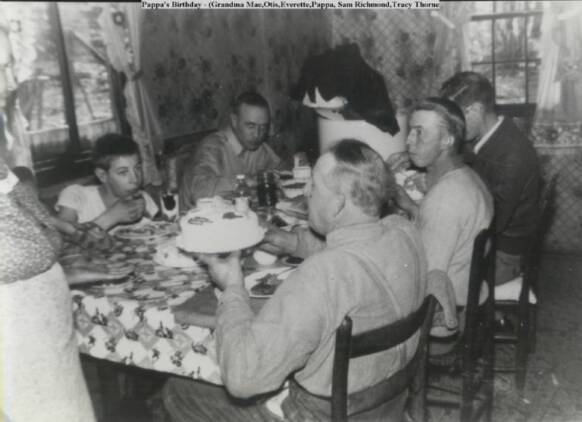
Grandma's kitchen, Papa's birthday.
Grandma Delphia Mae Bragg-Cales, Otis Cales, Everette Cales,
Tracy Thorne, Sam Richmond, Papa Julian Cales.
(February 12, 19??)